{ Inspiration }          { Fashion }          { Green[er] }          { DIY }          { Tips }          { Our Wedding }
Showing posts with label Tips. Show all posts

Thursday, March 24, 2011

Tips: Handmade Thank You Cards

All of our thank you cards have been mailed - for our wedding, for my shower, and now for my birthday. For each thank you, I used a different card. The thank you notes for the wedding matched our invitations. I purchased stationery from the Walgreen's across from my office for my shower notes. And for my birthday, well, I tried my hand at custom making cards.

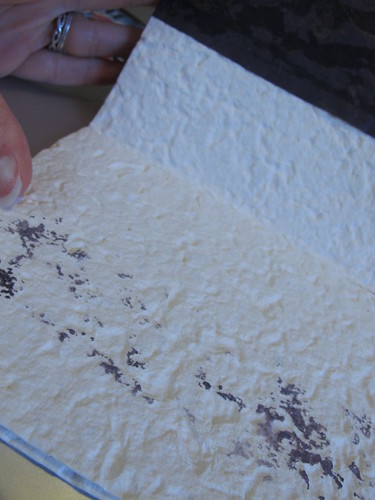
When making these cards, I learned a couple of things about handmade, treeless papers. Some are pretty thin, which means adhesives can soak through.

Glue was too wet for paper and stained it
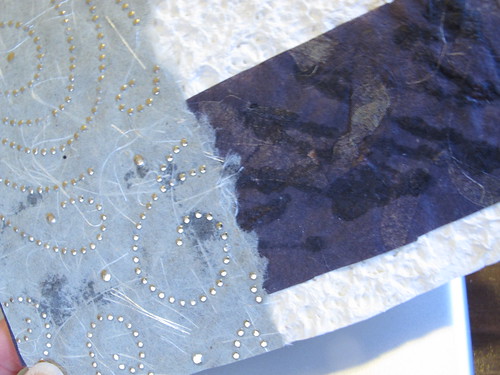
Color bleed where glue was applied

Others are pretty porous and take a lot of glue before you can affix it to something else.

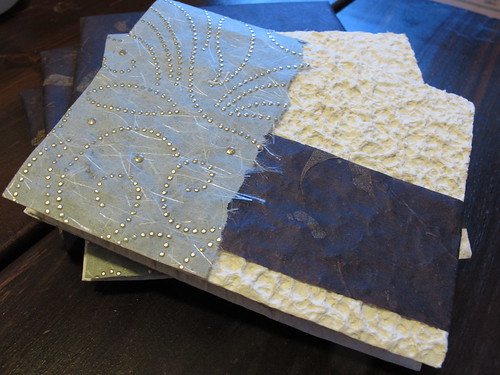
Handmade Note Cards

As you can see from the photo, the moonrock paper (off-white cardstock) has a lot of texture. This texture made affixing the other papers a little challenging as the paper wasn't always in contact with the glue.

One thing this experience taught me is I should have taken swatches and tried various adhesives rather than working on the final cards. Luckily I had extra materials and could redo the ones I ruined.

Making your own invitations? Try this to reduce your frustration:
  1. Purchase extra supplies to cover any mistakes.
  2. Purchase supplies for a mock up.
  3. Create swatches of your selected papers and try different adhesives. Note how quickly the glue dries, whether it causes ink to run, etc.
  4. Revise your design.
  5. Create your cards. 
Did you make your own invitations? What did you learn along the way? 

Tuesday, March 22, 2011

Caring for Vintage Leather Shoes


Can you tell which pair of cowboy boots are over 20 years old? 
Is it the pair on the left (Pair 1)? Or the right (Pair 2)?

If you've made the investment in quality leather shoes, you're probably going to want to keep them for awhile. The easiest way to do this is to regularly clean them, as well as check for scuffs, cracks in the sole, worn heels, etc.
  1. Check the toe for scuffs. 
  2. Inspect the sole at the toe - it can thin depending on how your shoes wear. 
  3. Look at the heel taps to see if they need to be replaced. 
  4. Test the insole to see if it's coming loose. 
  5. Inspect the insole to see if there's wear at the ball of your foot. 
  6. Check for wear inside the shoe where your big toe and little toe rub the sides.
If there's no noticeable damage, simply give your shoes a good cleaning; mademan has an easy-to-follow How to Polish Vintage Leather Shoes guide. If your shoes don't pass inspection, it's time to take them to the cobbler. When I lived in Austin, I sent my shoes to a local cobbler at least once every three months depending on how frequently I wore them. I recently just found a cobbler in SF who is able to reliably rejuvenate my shoes.

As you can see from the series of photos below my Amalfi Pumps need some minor repair at both toes and to the insole for one.

Now if you get a little lazy and your shoes fall into disrepair, before you toss them into the trash, visit a cobbler. They may be able to save them. I'd thought that my cowboy boots were destined for the rubbish pile - I'd worn into the stacked wooden heel. (I really wish I'd gotten a before photo - the repair was so amazing you'd never believe how badly I'd treated my boots.)

An example of 14-year old loafers that have had prior repairs made: new heel taps, three-quarters of the sole replaced, new toe taps, reinforced tongue, new insole. The cost of new repairs exceeds the cost of a new or gently used pair of loafers.
Luckily I took my boots to not one but two cobblers before deciding to give up on them. (I'd actually bought a brand new pair of cowboy boots to replace them after hearing from the first cobbler that the boots couldn't be salvaged.) The second cobbler completely replaced the heel. If you look closely, you can see where he added new wood. (I've lightened the photo to show the repair, it's not noticeable when you're wearing the shoes.)


I buy a lot of retro and gently worn shoes and boots. I'm intentionally avoiding the term vintage; some of the footwear is as new as five seasons ago (2005). Most are from the 1980s (I've bought replacements for shoes that I'd purchased new and loved to destruction). A few pairs reliably date back to the 1950s or early 1970s.

Here's a quick checklist of what I check for when I'm buying gently worn shoes.
  • Can the shoes be worn? Or does the seller recommend collecting or alternative use?
  • What are the actual measurements of the shoe? Sizes have changed a lot over the past 20 years. How were they taken - inside the shoe or from the sole?
  • Are the shoes leather or another material?
  • Where were the shoes made?
  • How much did the shoes cost new? Are they designer or a department store brand?
  • Have the shoes been repaired? 
  • If the shoes haven't been repaired, can any visible damage be repaired? Is the cost of the shoes plus repairs worth it? One of a kind - must have at any price. Or are you purchasing to save money.
  • Is the leather or fabric discolored? If the leather appears etched it could be due to salt and may not be repairable. I made the mistake of wearing soft leather boots with leather soles in Michigan. Each black shoe had a permanent ring about 1/2 an inch from the ground and the leather soles became so damaged water could soak through.
An example of Etienne Aigner loafers in need of some love. Unless almost free, I would pass on these at a thrift store as the repairs will typically run about $20 to $25. With new loafers running about $40 to $60, it's not worth the investment. 

Answer: Pair 2 are the boots that I had repaired. Pair 1 are a new pair of Dan Post Kylee boots from Zappos. Both pairs had been worn the same amount of time between the date of purchase/repair and when the photograph was taken. The boots currently destined for the consignment store are the Dan Post boots. First they'll visit the cobbler to see if he can fix the poor workmanship (the unfinished seams shred my ankle and calf when I walk).

Thursday, February 24, 2011

Finish Your Retro Look with Vintage Details

When you're planning a vintage affair, the details matter, starting with what you're wearing when the guests first see you and continuing to how you leave your reception.
cubes's reflection in the mirror of my overnight case.
After our wedding, cubes and I looked as if we'd just arrived from the past as we checked into the Hotel Triton. I was wearing a 1950s cocktail dress with vintage-inspired black Mary Jane pumps, holding my bouquet of antique hydrangeas with my box purse dangling from my wrist and clutching a train case in my other gloved hand.

While no one was observing our departure for our mini-moon, I still followed through with the vintage theme. I traded my train case for a set of three pieces: a hat case, an overnight case, and a small suitcase.

For my birthday, I chose to dress vintage. I decided on the 1950s with a gorgeous grey dress with full circle skirt, petticoat, black pumps, pink elbow length gloves, and pink purse.

Of course when cubes and I headed back to Yountville for our dinner at The French Laundry (an unexpected birthday present), I sported vintage accessories - the same pink purse I'd chosen for my birthday and the luggage from our mini-moon.
Purse by JR Florida was purchased from Klassy Klassics. Luggage was purchased from The Vintage Perspective's Post.
Until last week, I hadn't really accessorized with my pink purse. After the numerous compliments, I received it will definitely be making an appearance more often.

Wednesday, January 26, 2011

Pampering the Groom: A Custom Suit

It's not about you. It's about the two of you.

The majority of wedding blogs cater to women. With all the focus on the bride, it can be easy to forget that there's a groom too. No one ever exclaims "Say Yes to the Suit!" And a lot of men rent their wedding attire for the day. But it doesn't have to be that way. Grooms too can "Say Yes!"


In the first of this series, "Pampering the Groom," let's tackle the custom suit. Before we start, let's get the standard disclaimer out of the way: Neither cubes nor I have any affiliation with Proper Suit or Gilt SF. cubes needed a new suit so we took this opportunity to give grooms an idea of what you can expect when getting a custom suit. Prices start at $450.


After you've relaxed a little - gotten a bite to eat and a libation (wine or beer), it's time to make three decisions: 1. Fabric for your suit. 2. Fabric for your shirt (and/or vest). 3. Cufflinks.

The only trick with choosing a fabric for your shirt or vest is deciding whether you're complementing or matching the color palette for your wedding. Remember to bring swatches. If you're tackling this task together with your fiance, she'll probably have the swatches. It never hurts to ask for the swatches before you leave the house. If colors are one of her things, she'll be thrilled that you're thinking ahead.


Experts point out differences in materials and guide decisions such as two vents (Italian styling) or one vent (American styling) in your suit jacket. And to ensure your suit will fit perfectly, they take your measurements. Note it's not sufficient to just give them your suit size. Turns out that men's clothing is also subject to vanity sizing. (Who'd have thought?)

Typically your suit will arrive in two to three weeks. If you order a custom suit from Proper Suit around Chinese New Year, it will take a little longer - four to six weeks. The company Proper Suit works with shuts down for two weeks to celebrate the holiday.

Is your groom going the custom route?

Next up in the Pampering the Groom series, we'll talk about custom shirts.

Thursday, December 30, 2010

Tips: Creating a Vintage Palette

One way to create a color palette for your vintage wedding is to start with a postcard, greeting card, poster, or print advertisement from the period.

I found the following image at Cardcow.com. I then copied the image URL (on a Mac, ctrl+click and select Copy Image URL).
Victorian Couple Embracing on a Couch Romance & Love
Image courtesy of Cardcow
Then I copied the image URL into an online color generator. Both DeGraeve and Color Hunter provide vivid and dull palettes based on the selected image.

DeGraeve and Color Hunter provide a Hex value for each color. To get a Pantone value for each color, use the Color Picker in Adobe Photoshop. Be sure that Only Web Colors is not checked. Enter the Hex value and then click Color Libraries to get the appropriate Pantone color. 

Here's a vintage palette complementary to Pantone's 2011 color of the year: Honeysuckle. I started with a 1950s postcard from Arcanium Antiques.

Online Sources of Vintage Paper Goods
Free Color Palette Generators

Thursday, December 23, 2010

Tips: Planning a Vintage Wedding

Thinking of having a vintage wedding? Here are some things to consider before you start planning.

Image Sources: Timeless Vintage Vixen $390; Vintage Starr Beads $225; Melrose Antiques $125; Very Tres Chic $500
  1. What's your definition of a vintage wedding? Love My Dress highlights what "vintage" means to them.
  2. Once you have your definition, are you drawn to one specific period? 1940s. 1950s. 1960s. Something else? Your dress establishes your theme. I wore my mother's wedding dress (vintage 1967) and had it reconstructed for more of an Edwardian feel. At the reception I changed into a 1950s cocktail dress.
    Image Sources: Top Row: Couture Allure $245; Vintageous $225; Posh Girl Vintage $559; Timeless Vintage Vixen $360.
    Bottom Row:  Posh Girl Vintage $569; Couture Allure $145; Posh Girl Vintage $589

  3. Next, select a location that's period specific or complementary to your vision. Barns or orchards are perfect for a mid-century theme in the Bay Area as a lot of the land was agricultural. 
  4. If you go with a complementary venue, your decor will help bring the period to life. Flickr has many vintage print advertisements and photos of interiors to help you get started. 
  5. Do you have period items you can use in your decor? If you want a retro, casual, down home environment and have Lincoln BeautyWare canisters (and the colors complement your palette), you can tuck a vase inside them and use them in your centerpieces. If you love travel and have train cases, you can use them to hold programs, favors, and more. If you love to cook, include cookbooks in your centerpieces. (If you don't like the look of the covers, wrap them with handcrafted paper that matches your palette.)
  6. Decide if you want guests to get into the swing of things. Let them know in advance so that they can find appropriate attire. The 1960s are pretty easy as Mad Men provides lots of inspiration.
Image Sources: Top Row: Vintageous $215; Couture Allure $275; Couture Allure $195; Couture Allure $175; Posh Girl Vintage $529.
Bottom Row: Vintageous $180; Timeless Vintage Vixen $375.
    Once you decide whether or not to have a vintage wedding, if you're having engagement photos taken, you'll need to determine if you want a vintage photo shoot.

    Inspiration/Sources for Dresses
    Vintage Rentals


    Blogs Featuring Real Vintage Weddings

    Thursday, November 18, 2010

    Tips: Changing Your Online Name

    When you file your marriage license you need to decide whether or not you're going to change name and if you're going to change your name, what you're going to change it to. 

    Something that has amazed me is how the discussion of whether or not to change your maiden name tends to focus on the legal process of how to do so, potential impact on children, and salary penalties. What I didn't find was any mention of the impact of changing your online identity. So putting aside the ease of finding all of your health and financial records, here are other things that influence the decision to change your name:
    • What is your job?
    • Where are you in your career?
    • How strong is your brand?
    • Have you been published?
    • Is your name unique?
    • Is your planned name unique?
    • Is your planned name available on social media properties?
    A brief aside. First let me say that few of my records have the same name. Depending on who enters a double first name you end up with countless varieties and problems actually proving with one document what your legal first name is. My driver's license omits my middle name/initial so that the second part of my first name appears to be a middle name. Credit cards combine both first names into one long runon name. Student loans omit the second of my first name altogether and include my middle name. Nurses at doctors' offices give me funny looks when they can't find my health insurance and I start giving them four plus combinations of possible names under which I might have been entered into the system. So, as you can see, for me changing my name actually simplifies this mess. Now let's get back on topic.

    When changing your online identity or name look at each combination. What you think your brand is. What your legal name is. And abbreviations of first and middle names you might have been published under.

    For me, the combination of part of my first name "Eden" and maiden name "Hensley" is well branded and relatively unique. I've published under the name and I own it on LinkedIn, Twitter, and Facebook. (I stopped using my double first name ages ago to reduce confusion. My full name - all four names - does appear correctly in all of my school records.) 

    Just changing my last name yields a relatively unique name that is unfortunately well branded by someone else. She owns "Eden Silverstein" on LinkedIn and Facebook. To keep people from getting us confused online, I chose to change my middle name to my maiden name so that my new name will be "Eden Hensley Silverstein."

    Changing my name 100% though is not going to be a fun process. I'm not talking about Driver's License or Social Security Card - that's relatively painless. I'm talking about my online presence. 

    Most usernames are set - unchangeable. That leaves me with a hodge podge. In some cases, I've just created new accounts. In other cases, it's a little more work to create a new account (case in point: Flickr).

    If you're changing your name, have you thought about changing it online?

    For your convenience should you decide to change your name online, here are the sites I've worked through so far. 
    Sites where you can change your usernames:
    • LinkedIn
    • SEOmoz
    • StumbleUpon
    • Twitter
    • Facebook - they do warn you that this is a one time change
    • LiveJournal - for a $15 fee or 1,500 tokens
    • Yelp
    • OpenTable
    • Amazon (RealName attribution can be changed once you have updated bank information)
    • Netflix
    • Banks - this was surprising, but most welcome as having multiple usernames for managing one's finances is highly annoying (names on debit and credit cards as well as checks can be changed once you have updated your legal name)
    Sites where currently you can't change your usernames:
    • Alumni Email
    • New York Times (they will permit you to change your email and use that instead of your username to log in)
    • Flickr (would require you to create a new Yahoo! account)
    • Etsy (they recommend you use your real name yet do not provide an option for you to update your username should your real name change)
    • AdSense (while you can add new email addresses you can't change the account under which you first signed up)

    Thursday, November 4, 2010

    Tips: A Proper Thank You

    Our first batch of thank you's went out in May shortly after we received the first wave of gifts. Today I learned that procrastination (or absentmindedly forgetting where I placed our written thank you notes) is a good thing.

    Why? While I know that thank yous should be written and sent no later than a month after receiving the gift, I didn't know that amounts of money or gift certificates should not be mentioned. Oops. Thankfully that means I only have to rewrite three notes. (Luckily we didn't receive gift certificates in May. So no faux paus there.)

    For anyone who is unsure about how to write a proper thank you, check out Good Mouse Bad's tips. She covers every angle and gives concrete examples. For anyone who is uncertain when to send their thank yous or how many (a combined note for a shower gift and wedding gift or separate notes), here are delivery tips.

    Timing
    • For gifts received before the wedding, send thank you notes within 1 to 2 weeks.
    • For gifts received after the wedding, send thank you notes within a month after you return from your honeymoon - assuming you go on your honeymoon (or mini-moon) immediately after your wedding, not weeks or months later.
    Form
    No matter how tempted you are, never ever combine a thank you note. If a guest attended your shower and gave you a gift, send them a thank you note for that gift. If the same guest attended your wedding and gave you another gift, send them another thank you note for that gift.
    • For gifts received at your shower, send a thank you note on your stationery.
    • For gifts received at your wedding or sent to you both, send a thank you note on stationery that matches the paper goods from your wedding.

    All of our (and my) thank you notes - correctly written - should be in the mail by tomorrow. They'll be delivered within a month of the wedding (we're not leaving for our mini-moon until later this month so to wait until we returned would have been pushing it) so according to etiquette for most gifts we're timely. Unfortunately, for gifts that arrived during Syzygryd madness or between Burning Man and our wedding, some will be definitely late.

    Also... as it's more than two weeks after my shower, I fail in timeliness there. And running out of stationery (or being away for a week on a business trip) is no excuse at all (it just shows how horribly out of practice I am at proper acknowledgements).

    Hopefully our (and my) guests will understand and still appreciate the note.

    Friday, June 4, 2010

    Tips: Considering a Vintage Photo Shoot?

    To make a vintage photo shoot look authentic you have to go all the way. By all the way I mean either truly vintage clothes and accessories or accurate reproductions.

    First. Chose a period that you like.
    My design aesthetic - if I could chose any style under the sun to wear - is the 1930s, 1940s, and 1950s (primarily 1950s). Maybe I'm infatuated with the 1950s because I grew up in the 80s when lots of clothes were fashioned after the 50s. (Yes the 80s were the age of Flashdance and torn sweatshirts and leg warmers. No I didn't wear that style - it was banned at the high school I went to and it wasn't appropriate for the Real Estate Office I worked in as receptionist.)
    Soda Fountain Dress in Cola
    $44.99 1950s Inspired Dress from ModCloth

    Second. Learn more about that period's clothing style by looking at vintage patterns, online clothing stores, or fashion history sites.
    There are lots of stores out there that have vintage patterns or clothes for sale. SoVintagePatterns is a good place to start for women. They group patterns by period - 1940s, 1950s, etc. This is great if you like a particular style but aren't sure what period it's actually from. RustyZipper is a good place to start for men. They group suits by period - 1940s & 50s, 1960s, etc. Fashion-Era.com walks you through what happened in a period to influence changes in fashion. Information is grouped by period.

    For example, I love this 1930s outfit that Nicole Kidman wore in Australia. It won't work for our 1950s shoot. But I love it anyway.:

    While it's not appropriate for a 1950s shoot, I was able to find a skirt type from the 50s that had a similar silhouette - Slim Mermaid Skirts.

    Third. Consider your theme for period accessories.
    As you know we're going to be doing a vintage photo shoot that focuses on cooking (it's for the cover of our cookbook we'll be giving out as a wedding favor). SoVintagePatterns has a wide range of Vintage Apron Patterns.
    1950s (Source)

    1940s (Source)

    Fourth. Select your location.
    Once you have your clothes figured out, you need to take a look around the room or space you'll be photographed in. If you're looking to get photographed in a kitchen, you probably don't want a granite countertops with stainless steel appliances. Antique Vintage Appliances offers kitchen appliances so you can get a general idea of what 1950s appliances looked like.

    If you don't want to transform a space for an afternoon, check out local restaurants. In San Francisco, there are a few 1950s-styled diners. For example, It's Tops.
    (Source: Photograph by Jimmy L)

    Fifth. Outfit your location.
    If the decor and knick knacks in the space are modern, you're going to need to give the room a temporary face lift. If you're wondering what a kitchen from the 1950s might have looked like, Kitchen Decorating Idea offers tips on how to outfit your space. Dream Kitchen in the UK offers a bunch of Retro Kitchen Accessories. Once you know what your space should look like, you can raid your home, your family members' homes, and your friends' homes for accessories.

    How far are you willing to go for a vintage photo shoot? Have you thought about appliances and kitchen accessories or just your clothes?

    Saturday, May 22, 2010

    Tips: Trawling the Interwebs for Inspiration and Ideas


    There are lots of sites/blogs available for inspiration. Here are some of the ones that I went to (and still go to). Note that not all of them are targeted towards brides or grooms.

    Sites for Inspiration
    Sites for Eye Candy (Staged Inspiration Shoots and/or Real Weddings)
    Sites for Accessories/Fashion Trends
    Sites for Decor Ideas
    Sites for Eco-friendly Green Weddings
    Sites for DIY Projects
    What sites/blogs did you find the most helpful?

    Thursday, March 4, 2010

    Vendors: Best Advice So Far

    "When booking vendors and making major decisions regarding your wedding, your instincts will be your best guide. You can read reviews up the wazoo, see brilliant examples of their work online, but if you meet with a vendor and the alarm bells go off, keep looking, 'cuz they are not right for you." from Miss Trail Mix at WeddingBee.com

    So far, we've made a bunch of major decisions - photography (Icka Boo); dress and suit (Miss Velvet Cream); rings (Sholdt Design from Mansoor & Gore Jewelers - totally worth waiting for!); venue (Swedish American Hall - a choice I'm absolutely tickled about); wedding cake baker (Cafe Gratitude); and cake topper maker (The Builder's Studio on Etsy). With all the decisions they've just felt right. Hopefully we'll be able to continue this trend.
    Related Posts Plugin for WordPress, Blogger...